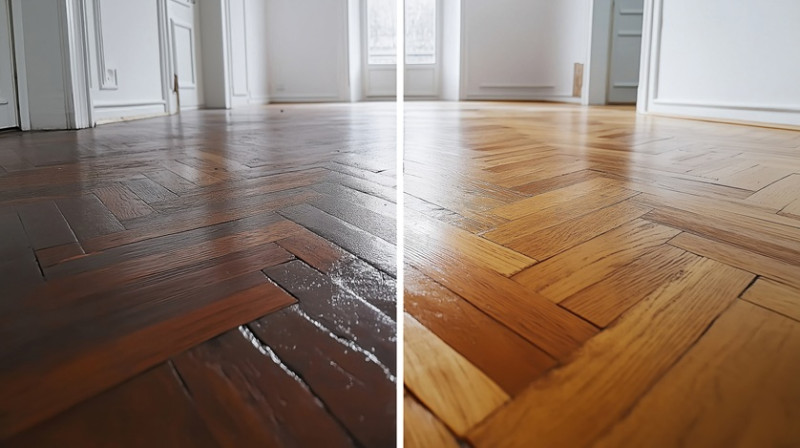
Wood floors are timeless, stylish, and add significant value to any property. But over time, even the highest quality wood flooring starts to show signs of wear. Scratches, dull patches, discolouration, and squeaky boards can all affect the look and feel of your space. Fortunately, full wood floor restoration can bring old timber back to life – often looking even better than the original finish. In this post, THE HANDYMAN walks you through the entire wood floor restoration process, from start to finish.
Why Restore Wood Flooring?
Restoring wood flooring is more than just a cosmetic fix – it’s a smart investment. Whether you're a DIY enthusiast, a young professional redecorating your first home, or a tradesperson providing services to clients, understanding the value of restoration is key.
Old wooden floors often contain high-quality timber that you can’t find in modern floorboards. Rather than replacing them with laminate or vinyl, restoring them enhances their natural grain and unique character.
Restored wooden floors are more durable, easier to clean, and can significantly boost the value of your property. They're also more sustainable, reducing waste and making use of existing resources.
For UK homeowners, especially in older Victorian and Edwardian properties, restoration is often the only way to preserve the period charm and architectural value of the flooring.
Step 1: Prepare for Restoration
Preparation is critical before starting any restoration project. Begin by removing all furniture, rugs, and any other obstacles from the room. Give the floor a thorough clean to remove any surface dust and debris. This allows you to closely inspect the condition of the flooring.
Look for damaged or loose boards. You'll need to address these first—either by securing nails or replacing individual planks—before proceeding to sanding or staining. If the floor has been previously treated with wax or varnish, a chemical stripper may be required to remove residual coatings.
It's important to ensure the environment is dust-controlled. Seal doorways with plastic sheets and use vacuum-assisted sanders if possible. This adds to a cleaner workplace and ensures a neater finish later on.
Take this opportunity to remove any skirting boards if you plan on sanding right up to the edges. If you're using professional tools, make sure safety goggles, masks, and ear protection are on hand before moving forward.
Step 2: Sanding the Wood Floor
Sanding is arguably the most important stage in the wood floor restoration process. Done correctly, it removes the top layer of the timber—including old stains, varnishes, and imperfections—revealing the fresh wood beneath.
Start with a coarse-grit sandpaper (e.g. 36-grit) to strip existing finishes. This is followed by medium-grit (60–80) and finally fine-grit (100–120) paper to smooth the wood for staining or varnishing. Most professionals use a belt or drum sander for main areas and an edge sander for corners and edges.
If you're a DIY enthusiast, be aware that hiring professional sanding equipment from suppliers like HSS Hire or Jewson is straightforward and cost-effective. Just ensure you watch a tutorial or speak to an expert before using powerful sanding tools.
Between sanding passes, vacuum thoroughly to remove excess dust. This prevents particles from becoming embedded into the wood during staining or sealing. Don’t rush this step—patience leads to a cleaner, more professional result.
Dealing with parquet flooring? Use a slightly different sanding technique—diagonal or cross-grain sanding works best for these intricate patterns and helps maintain their structure.
Step 3: Repair and Fill Gaps
Once sanding is complete, assess the floor for gaps, cracks, nail holes, or knots. These imperfections can be filled with a specialist wood filler or a sawdust filler created by mixing fine wood dust with a binding solution (available from most DIY stores).
This step isn’t always necessary, especially if you want to preserve the “character” of older floors. However, for a modern, finished look, filling gaps and cracks creates a smoother, more uniform appearance that’s easier to clean.
In the UK’s older homes, floorboards often expand and contract with seasonal humidity. For larger gaps, wood slivers (thin strips of timber) glued into the joints offer a durable filler that adjusts naturally with temperature changes over time.
Leave your filler to dry according to the manufacturer’s instructions—usually between 2 to 24 hours. Then give the floor one final sanding pass using a fine-grit paper to ensure everything is flush and smooth.
Step 4: Staining and Colour Choices
Staining allows you to customise the colour and tone of your timber floor. Whether you prefer a rich oak, Scandinavian white-wash, or deep walnut finish, there’s a huge variety of stain colours available at UK suppliers like Ronseal, Osmo, and Fiddes.
Always test your stain on a small, inconspicuous area—different species of wood absorb stain differently. Pine, for example, can take stain unevenly, so applying a pre-stain conditioner may be necessary to obtain a consistent finish.
Apply staining with a brush, cloth, or pad applicator, working in the direction of the wood grain. Be careful not to leave pools of stain—it should be wiped off after a few minutes to avoid blotchy results.
Most homeowners choose to stain wood floors to match existing interior decor. For modern, minimalist spaces, lighter tones or clear finishes work best. For period properties or cosy aesthetics, darker tones provide a classic and luxurious atmosphere.
Create an even, streak-free stain application for each section before moving on. Let the surface dry completely for 24 hours before the sealing step.
Step 5: Sealing and Finishing
The final step of restoring your wood floor is sealing it to protect against wear, moisture, and UV light. Sealing does more than safeguard your hard work—it enhances the colour and grain of the wood beneath.
UK restoration professionals typically use either polyurethane varnish, hard wax oils, or water-based sealers. Your choice depends on desired finish, durability, and drying time:
| Type of Finish | Appearance | Durability | Drying Time | Best For |
|---|---|---|---|---|
| Polyurethane Varnish | Gloss or satin finish | High | 8–24 hrs | High-traffic areas |
| Hard Wax Oil | Natural, matte look | Medium to High | 4–12 hrs per coat | Living areas, bedrooms |
| Water-Based Lacquer | Clear, low odour | Medium | 2–6 hrs | Quick turnaround projects |
Apply 2–3 thin coats using a roller or brush, allowing proper drying time between applications. Lightly sand between coats using very fine grain sandpaper for optimum adhesion and a smooth touch.
Step 6: Aftercare and Maintenance
Once your restored wood floor is fully dried (usually after 3–5 days), it’s ready for use. That said, early care is essential to preserve its beauty and longevity.
Avoid heavy foot traffic or replacing furniture immediately. Use felt pads under chairs and tables to protect the new surface. Rugs and mats can help reduce wear in high-traffic areas like hallways and kitchens.
For cleaning, avoid soaking the floor with water. Use a damp mop and pH-neutral wood cleaner to maintain the seal and shine. Never use bleach or harsh alkaline cleaners, as these can damage the wood and finish.
Re-sealing every few years (depending on traffic level) will keep your floors looking brand new. For high-traffic commercial or rental properties, opt for more durable finishes like varnish or lacquer and schedule professional inspections every 5 years.
Hiring a Professional vs DIY
Many homeowners across the UK take on wood floor restoration as a challenging but rewarding DIY project. With the right tools and a bit of patience, you can save money and gain huge satisfaction from completing the job yourself.
However, if the floor has deep structural issues, severe cupping, or complex inlays (such as parquet or herringbone), it may be best to hire a qualified restoration specialist. They have the expertise, advanced tools, and experience to tackle any hidden problems and guarantee a high-quality finish.
Architects and interior designers working in listed buildings should always consult with restoration experts to ensure compliance with regulations protecting period features.
Final Thoughts
From preparation to polishing, wood floor restoration is a rewarding process that transforms tired, faded flooring into a spectacular centrepiece. Whether you decide to do it yourself or work with a professional, understanding the process helps ensure the final result is both functional and beautiful.
At THE HANDYMAN, we’ve helped hundreds of UK homeowners and trade professionals breathe new life into their wooden floors. If you're starting your own renovation project and want advice or help with specialist equipment, don't hesitate to reach out. Your dream floor is just a few steps away.
Want more DIY and renovation tips? Sign up for THE HANDYMAN newsletter and get free weekly guides on home improvement, tools, and techniques—tailored for UK homeowners and professionals.
