When it comes to making an unforgettable impression with your interior design, few flooring styles match the timeless elegance of herringbone hardwood. Whether you're a DIY enthusiast revamping your first property, a young professional with a passion for stylish home décor, or a seasoned architect designing a luxury project, mastering the mechanics of installing herringbone flooring can elevate your space.
Despite its complex appearance, learning how to install herringbone hardwood flooring is rewarding with the right preparation, tools and techniques. This guide is tailored specifically for UK homeowners, designers, and tradesmen ready to jump into this stylish trend while ensuring durable and professional-looking results.
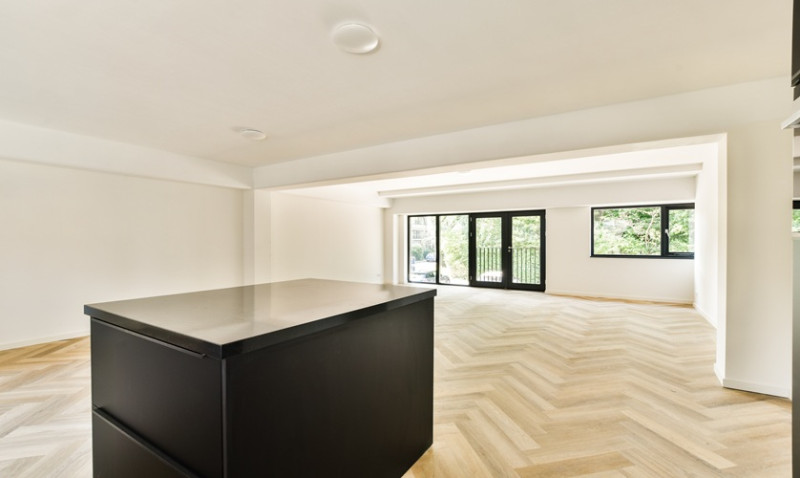
What Is Herringbone Flooring?
Herringbone is a classic pattern distinguished by rectangular planks arranged in a staggered zigzag formation. Often confused with chevron patterns, herringbone differs in that the ends of the boards meet at a 90-degree angle, not a point. This sophisticated layout dates back to ancient Roman roads and French parquetry and continues to be a top choice in modern luxury homes throughout the UK.
Herringbone works particularly well in living rooms, hallways, open-plan kitchens and entranceways—areas where its intricate design can truly shine. Not only does it add a sense of depth and movement to the room, but it also creates a sense of craftsmanship that is both vintage and fashion-forward.
While it’s most often found in engineered hardwood and parquet blocks, these days you’ll also find herringbone patterns in LVT, laminate and even ceramic tiles. However, for those who crave warmth, lifelong durability and authentic character, nothing matches real hardwood laid in a herringbone pattern.
Tools and Materials You'll Need
Before beginning installation, it's crucial to gather all necessary tools and materials. Here's a handy checklist to get you started:
| Tools | Materials |
|---|---|
| Chalk line or laser line | Engineered or solid hardwood herringbone blocks |
| Flooring nailer or adhesive trowel | Suitable adhesive (for glue-down installs) |
| Rubber mallet | Moisture barrier (if necessary) |
| Tape measure and metal square | Underlay (for floating systems, if required) |
| Mitre saw or table saw | Spacers for expansion gaps |
| Spirit level | Decorative border or trim (optional) |
Make sure your subfloor is level, clean and dry before you begin. This ensures a flawless installation and prevents future movement or cupping of boards. In UK homes, especially older properties, investing time preparing the subfloor can save countless future headaches.
Step 1: Let the Wood Acclimatise
Begin by bringing your hardwood into the installation room at least 48-72 hours in advance. This allows the wood to acclimatise to the room’s humidity and temperature. Failing to do this step is a common mistake and can cause expansion or contraction after installation—resulting in gaps or buckling.
In the UK, where seasonal moisture levels change frequently, especially in period homes or ground-level properties, acclimatisation is critical. Lay the boxes flat, not upright, and remove any plastic wrapping to allow air to circulate around the boards.
Keep the room heated to the normal everyday usage temperature (ideally between 18-22°C). This condition mimics what the flooring will experience in daily life, making it easier to adjust and settle properly once laid.
Step 2: Plan the Layout
The beauty of herringbone lies in its symmetry, but that’s also what makes it challenging. Start by finding the true centre of the room using a chalk line or laser level. From this point, you’ll lay out a dry run (known as a “dry lay”) to visualise how your planks will fall across the room.
Begin with a spine or central axis that the pattern will branch out from. In some cases, installers use a temporary wooden batten screwed into the floor to guide the first few rows precisely. This brings stability and ensures your angles don’t drift as you work outward.
It’s also essential to decide whether you want to install a border around the room. Borders not only protect your design from being cut short at the edges but also provide a polished framing that enhances the overall aesthetic. Architects and interior designers often prize this detail for its luxurious finish.
Step 3: Choose Your Installation Method
Herringbone hardwood can be installed in a few different ways, depending on the type of flooring you’ve chosen and the nature of the subfloor:
- Glue-down: Most recommended for engineered and solid hardwood. Especially ideal for UK homes with concrete subfloors.
- Secret nailing: Typically used for solid hardwood boards over a wooden subfloor or battens.
- Floating: Occasionally used for click-lock engineered systems, but not ideal for complex patterns like herringbone.
In the majority of UK homes, herringbone with engineered hardwood and glue-down installation offers the best balance between stability, appearance, and long-term durability, especially when underfloor heating is present.
Spread adhesive in small areas at a time so it doesn’t dry out. Follow the manufacturer's instructions closely, and always use a notched trowel to ensure consistent bonding over the entire surface area.
Step 4: Begin Installation
Start laying your herringbone blocks along your guide or central line, placing each piece precisely to create the V-shaped pattern. It’s crucial to maintain right angles, checking alignment every few rows using a set square.
As you work, gently tap each plank into place using a rubber mallet to ensure a snug fit. Use spacers at the perimeter to account for expansion, typically 10-15mm away from the wall.
Continue working in small sections, never rushing. It helps to step back every few rows to visually confirm the pattern is staying straight and flat. That consistency is what gives herringbone flooring its impeccable appeal.
In doorways or awkward corners, precision cuts will be required. Take accurate measurements and always dry-fit before final fitting. A mitre saw is essential here for making neat, accurate cuts that won’t compromise the look.
Step 5: Fitting the Borders and Final Rows
Once the main body is laid, it’s time to finish with any decorative or framed borders. Fit these elements next, trimming any angled pieces to match. Use a track saw or circular saw with a guide rail if necessary to achieve clean, professional edges around the perimeter.
Trims or accessories such as scotia beadings, threshold strips, or stair nosings can be added depending on your chosen room layout. If you're tying rooms together through doorways, continuity of pattern is key for an uninterrupted flow.
Step 6: Allow to Set and Finish
Once the last plank is installed, allow the adhesive to cure for the time specified by the manufacturer—usually 24 to 48 hours. During this time, avoid heavy foot traffic and do not move furniture back into the space.
After curing, clean the floor gently with a dry microfibre mop to remove any dust or debris. If your boards are unfinished or lacquered onsite, apply the desired oil, stain or lacquer to seal and protect the surface.
Regular maintenance will keep your herringbone floor looking stunning for decades. A hardwood floor cleaner, proper felt protectors on furniture, and care to avoid excessive moisture can all preserve its elegant aesthetic.
Final Thoughts: Embrace the Craft
Installing herringbone hardwood flooring is more than just a home improvement project—it’s a statement of style, taste and heritage. While the process requires attention to detail and patience, the results are well worth it. With proper preparation and execution, you’ll achieve a floor that not only enhances the beauty of your space but adds long-lasting value to your home.
Whether you're revamping a Victorian terrace in London, outfitting a boutique in Manchester or completing a modern apartment in Glasgow, herringbone hardwood is a design choice that speaks volumes. Invest in quality materials, measure twice, and trust the artistry—your future self will thank you every time you walk through the room.
