If you're looking to elevate the style of your home with a contemporary twist on a timeless design, Kronotex laminate herringbone flooring is a fantastic choice. Popular across homes in the UK, herringbone is a classic pattern known for bringing elegance and depth to both modern and traditional interiors. In this comprehensive DIY guide, we’ll walk you step-by-step through how to install Kronotex herringbone laminate flooring in your space – ideal for homeowners, designers, tradespeople and renovation enthusiasts alike.
Why Choose Kronotex Herringbone Laminate Flooring?
Kronotex is a renowned name when it comes to high-quality German-manufactured laminate flooring. Their herringbone collection not only offers durability and water-resistance but also mimics the elegant look of real hardwood at a fraction of the cost. Available in a wide range of finishes, from warm oaks to cool greys, Kronotex flooring works beautifully in homes, offices, or commercial spaces across the UK.
One of the standout features of Kronotex herringbone laminate is the clever click-lock system, designed for fast and secure installation without glue or nails. This makes it particularly attractive to DIYers or first-time renovators who want professional results without the price tag of professional labour.
The flooring also comes with AC4 or AC5 wear ratings, making it suitable for both residential and light commercial use. Its scratch resistance, moisture tolerance, and even compatibility with underfloor heating systems are all reasons why so many homeowners and professional installers prefer Kronotex.
Whether you're revamping a hallway, living room, or even a home office, installing this laminate flooring yourself is a rewarding project that can increase your property’s value and aesthetic appeal.
Tools and Materials You'll Need
Before you begin, it’s important to gather all the tools and materials required to complete your herringbone laminate flooring installation. Here's a concise list:
| Tool/Material | Purpose |
|---|---|
| Kronotex Herringbone Laminate Packs | Your main flooring boards |
| Underlay | Provides insulation and reduces sound |
| Tapping block and pull bar | Assist in fitting boards snugly |
| Spacers | Maintain expansion gap around walls |
| Utility knife or hand saw | To cut boards if needed |
| Measuring tape & pencil | Accuracy in measurements |
| Spirit level and chalk line | Ensure a straight and level start |
Having these tools prepared in advance will save you time and avoid frustration as you proceed through the install process.
Preparing the Subfloor
The first rule of laminate flooring installation is that preparation is everything. You’ll want a subfloor that is clean, dry, level and firm. Whether you're laying over concrete, tiles or wood, take the time to inspect and prepare it properly.
Start by thoroughly cleaning the subfloor. Remove any dust, nails, or old adhesive residue that could cause bumps or unevenness. If your floor is uneven beyond 3mm over 2m, you’ll need to use a self-levelling compound to even it out before proceeding.
Moisture is also a key concern. If you're installing over concrete or in any moisture-prone areas (like ground floor rooms), adding a moisture barrier or selecting an underlay with integrated vapour protection is essential.
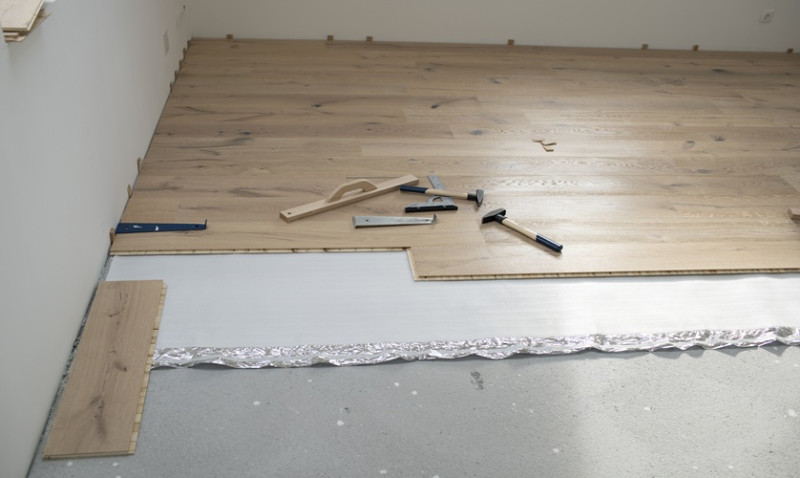
Once prepared, roll out your underlay across the room in the direction you plan to install the laminate. Tape the seams and trim any excess to fit tightly against the wall, ensuring no overlap. The underlay not only improves foot comfort but also enhances acoustic insulation and helps extend the life of your flooring.
Understanding the Herringbone Pattern
Before diving in, it’s essential to understand the structure of the herringbone layout. Each set of planks will consist of ‘A’ and ‘B’ pieces—designed to interlock at a 90-degree angle to form the signature “V” shape pattern.
This isn’t like laying straight laminate boards. Herringbone patterns require meticulous planning and measuring to get the alignment just right. Failing to establish the correct layout at the start could create awkward joints and unattractive visual results that are impossible to correct later.
A centreline or chalk line is the most reliable method to ensure symmetrical and balanced installation. Measure and mark the centre of the room, then snap a chalk line down its length. This will act as your visual guide throughout the installation.
Lay a dry run of several boards (without clicking them together) to see how the pattern will flow. This helps ensure that you won’t end up with tiny slivers of laminate at edges or doorways, which can be both unsightly and prone to damage.
Step-by-Step Installation Process
Once all your prep work is done, you’re ready to begin installing your Kronotex laminate herringbone flooring. Here’s a step-by-step breakdown:
Step 1: Start the First Row
Begin in a central point along your chalk line. Connect an A-board and a B-board at a right angle, forming the first “V” shape. The tongue of each board should face outward. Continue adding V-pairs along the line to establish a full initial row.
Step 2: Build to the Sides
From your central row, work outward toward each wall. Be sure to stagger the joints to maintain the herringbone effect. Use your tapping block gently to snap each plank into place. Remember: Kronotex floors don’t need glue – rely on the Uniclic-style locking mechanism.
Step 3: Cut Edge Pieces
Once you approach the walls or fixed objects, you’ll need to cut individual boards to fit. Use your measuring tape and pencil to mark precise cuts and either use a utility knife for small trims or a handsaw for longer cuts. Don’t forget to factor in the expansion gap here (typically 10mm).
Step 4: Use Spacers
Around all walls, door frames, radiator pipes etc., place spacers to maintain a 10mm expansion gap. This prevents buckling and allows the laminate to expand and contract with temperature changes across seasons.
Step 5: Final Rows and Touch-Ups
The final rows might require more intricate cuts. Take your time with measurements and use a pull bar to slot boards where space is tight. Once finished, remove all spacers and install appropriate skirting boards or scotia to neatly hide the expansion gap.
Finishing Touches and Aftercare
Congratulations! With all your planks securely installed, it’s time to give your new herringbone laminate floor the finishing touches that make it shine. Vacuum or sweep the floor to eliminate dust or small pieces. Avoid dragging furniture directly across the floor to prevent scratches.
If you’re installing in a hallway or busy area, consider using rugs or pads under furniture legs to extend the life and appearance of your floor. Kronotex laminate is known for being low maintenance, requiring only regular sweeping and an occasional damp mop with a laminate-safe cleaner.
It’s also important to avoid excess water during mopping, as pooling liquid can seep into joints despite the floor’s moisture resistance. Promptly wipe up spills and ensure the room is well ventilated, particularly during the first few days after installation.
Under heavy furniture or at exposed edges (such as patio doors), aluminium transition strips or edge protectors help increase the durability of your new flooring and provide a polished, professional finish.
Common Mistakes to Avoid
Installing laminate herringbone flooring is very doable for most DIYers, but there are a few common pitfalls to watch out for:
- Failing to let the flooring acclimatise for 48 hours before installation
- Skipping subfloor preparation – always ensure level and clean surfaces
- Incorrect start point – misaligned starting rows throw off the whole pattern
- Neglecting the expansion gap around walls and fixtures
- Using excess force and damaging the click-lock mechanism
- Not protecting your floor immediately after installation
Following the tutorial above carefully will ensure that you avoid these mistakes and end up with a flawless finish worthy of any professional showroom.
Final Thoughts
Installing Kronotex laminate herringbone flooring is a rewarding and stylish upgrade for any home. With precision, the right tools, and attention to detail, even novice DIYers in the UK can achieve a luxurious look without hiring a floor fitter. This timeless pattern adds charm and sophistication, making it ideal not only for domestic spaces but also for commercial and retail design projects.
If you’re ready to create a statement floor that blends function with stunning design, Kronotex laminate herringbone is a smart and trend-proof choice – one that adds value and beauty to your property for years to come.
