Laminate flooring is an incredibly popular choice for homes and commercial spaces across the UK. It’s durable, stylish, and relatively affordable – making it a top pick for DIY enthusiasts, interior designers, and builders alike. However, even the most robust laminate can fall victim to scratches and gouges over time.
The good news? You don’t need to tear up your flooring or call in a costly professional. With just a few simple techniques and tools, most scratches and small gouges in laminate flooring can be repaired quickly and easily – restoring your floor’s good-as-new finish.
In this step-by-step blog post, we'll show you how to fix scratches and gouges in laminate flooring with minimal fuss. Whether you're a first-time homeowner, a design-savvy Londoner revamping your flat, or a seasoned tradesman, this guide has you covered.
Understanding Laminate Floor Damage: Scratches vs. Gouges
Before we dive into the fixes, it’s important to understand what kind of damage you’re dealing with. Not all floor damage is created equal – and the method of repair will vary depending on the type of imperfection.
Scratches are surface-level markings often caused by furniture legs, pet claws, high heels, or dust and grit settling under foot traffic. They're usually only visible when light strikes the floor at an angle.
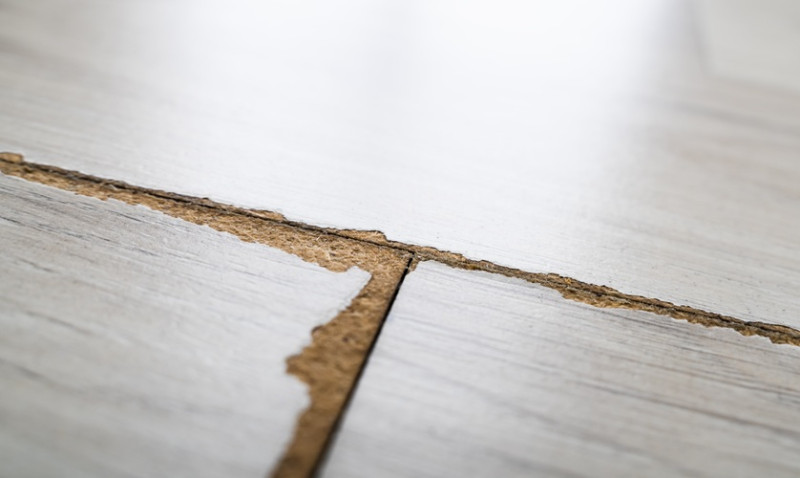
Gouges, on the other hand, are deeper. These occur when a heavy object drops or something sharp drags across the surface, removing a chunk from the laminate wear layer.
Identifying the type of damage will help you choose the right repair product and prevent further floor issues.
Tools & Materials You'll Need
Most scratch and gouge repair jobs don't require anything fancy – in fact, everything you need is widely available at UK DIY retailers like B&Q, Wickes, or Screwfix. Here’s a list to get you started:
- Laminate floor repair kit (colour-matched to your floor)
- Soft cloth or microfiber towel
- Fine grit sandpaper (320+)
- Putty knife or plastic scraper
- Vacuum or dust brush
- Lacquer or sealant (optional)
When choosing a repair kit, many brands include wax pencils, filler putties, and mixing compounds to match your existing floor colour. Top choices in the UK market include brands like Ronseal, Reccomendit, and the DIY stores' own-brand repair packs.
How to Fix Minor Scratches in Laminate Flooring
Light scratches are the simplest to fix and often require nothing more than a touch-up pen or wax crayon. Here’s the quick process:
- Clean the scratched area using a damp cloth and mild cleaner. Allow it to dry fully.
- Use a colour-matched wax pencil from your laminate floor repair kit. Gently rub it over the scratch until it’s filled in.
- Buff the area with a soft cloth to blend the wax with the surrounding surface.
- For deeper surface scratches, apply laminate floor scratch repair liquid or marker to restore the look.
This method works great for a quick cosmetic fix. It won’t make the floor harder-wearing, but it will make those annoying scratches practically invisible.
Fixing Deeper Gouges in Laminate Flooring
If your laminate floor has gouges or deeper dents, you'll need to use a plastic putty or filler compound. It may sound intimidating, but it’s easier than you think with the right steps:
- Start by cleaning the damaged area thoroughly and drying it completely. Any debris will prevent the filler from bonding properly.
- Using the colour-matched putty included in your repair kit, mix the correct shade to match your floor (if required).
- Apply the filler into the gouge using a plastic scraper or putty knife. Smooth over the surface, removing excess material.
- Let the filler set according to the manufacturer's instructions – usually 30-60 minutes.
- Gently sand the area with a fine grit pad if necessary, then wipe clean with a slightly damp cloth.
- Optionally, apply a sealing top coat to protect the repaired area from future wear.
Once dry, the filled gouge should be flush with the rest of the laminate floor and virtually undetectable unless closely examined.
Top Tips to Prevent Future Damage
Once you've repaired your floor, the best way to keep it looking perfect is to take preventative steps. Here are some simple tips to reduce future floor damage:
- Use felt pads or rubber feet under heavy furniture and chairs
- Place mats or rugs in high-traffic areas, especially entrances
- Keep pet nails trimmed to avoid claw marks
- Regularly sweep or vacuum to remove grit and dust
- Avoid dragging furniture – lift instead
These small changes go a long way in preserving your laminate flooring’s finish for years to come.
Explore Laminate Repair Kits Available in the UK
Looking for the best laminate repair kit to use for your fix? Here’s a handy table comparing some popular options available in UK stores:
| Product | Includes | Where to Buy | Approximate Price |
|---|---|---|---|
| Ronseal Floor Repair Kit | Wood fillers, colour tints, application tools | B&Q, Amazon | £12.00 - £15.00 |
| Quick-Step Laminate Repair Kit | Wax blocks, melting tool, mixing guides | Wickes, Flooring specialists | £25.00 - £30.00 |
| Woka Laminate Wax Repair Kit | 11 wax sticks, melting tool, scraper | Amazon UK | £10.00 - £15.00 |
If you're in doubt about your floor’s colour match, many manufacturers provide colour code support—so check your laminate type before buying.
Conclusion: Breathe New Life into Your Laminate Floors
Laminate floors are a smart, fuss-free flooring solution loved by homeowners and professionals throughout the UK. And while no flooring is truly damage-proof, quick maintenance and the right repair techniques can keep your surfaces looking immaculate for years.
Whether you’re touching up minor scratches or tackling deeper gouges, our quick and easy guide empowers you to restore your laminate floor without breaking the bank – or a sweat.
Be sure to follow best practices, invest in quality repair products, and take care of your laminate with consistent cleaning and protective measures. You’ll be rewarded with a beautiful, lasting floor that continues to enhance your home’s aesthetic and value.
Happy repairing!
